Archive for the ‘Breakfast’ Category

Orange Cranberry Muffins

Thursday, February 2nd, 2012

Cranberry_Orange_Muffins_sm

This recipe starts with a story.

See, our local grocery store ran a “traffic stopper” deal on Oranges throughout January. Super yummy oranges. From California. And these oranges were sold in 8lb. bags – on sale – every monday – all month. We may or may not have purchased 7 bags (56 lbs.) of oranges throughout the month. We ate plenty of them fresh, juiced even more of them (ah, fresh squeezed orange juice), and made these muffins. We may or may not have made them more than once.

Ok, back to the oranges.

We had lots. I tried making Cranberry-Orange bread once before. It was less than successful. Maybe it was the recipe I used. But the flavor… the flavor was something was craving. So I got my google on and started searching. There were plenty of things I liked about this recipe or that, but nothing quite perfect. So, I went ahead and took this from that recipe, and that from another. I wanted to get a nice orange-infusion. And I had the oranges to make it happen. So, after a bit of adding and subtracting, we have the following recipe.

One that I may or may not be making again today.

Cranberry Orange Muffins

2 1/4c. flour
3/4c. sugar
2 tsp. baking powder
1/4. tsp. salt
1/4. tsp. baking soda
4 Tbsp. zested orange peel
3/4 c.  freshly squeezed orange juice (about 3 oranges)*
optional: 3-4 Tbsp of the pulpy orange innards (just adds a little extra orangy-goodness)
1 Tbsp. milk
1/4 c. melted butter
1 egg, beaten
3/4 c.  dried cranberries**

Preheat oven to 400˚ and prepare muffin tins (grease tin or line with paper/foil cups)

In a large bowl combine dry ingredients. Whisk together.
In a separate bowl combine orange juice, zest, and pulp with melted butter, milk, and egg.

Add wet ingredients to dry, stirring just until incorporated.
Fold in cranberries

Bake for 15-2o min. Until tops are a light golden.

*Orange juice made from concentrate or otherwise purchased can be used if necessary.
**If using fresh cranberries, add 1 1/2 c. instead.

So there you have it. They are SOOO GOOD! And I am totally making them again today!

Homemade Cream of Wheat!

Friday, January 20th, 2012

So. My family is sick. All of us.
The aliments range from a mild cough, to a sore throat, to croup and other more flu-like nastiness. Thankfully, I am on the luckier end of things with just the sore throat. Its no fun, as I’m sure many of you know, from experience no doubt. Despite the wide range of illness around here one thing we all have in common is a lack of desire to eat. Yep, you heard me… no one wants to eat. At least no one wants to eat normal everyday foods. My attempt at meal planning as gone straight out the window this week.

So this morning. Breakfast.

We had exhausted our supply of smoothie ingredients, and probably had one too many of those anyway. We’d done the pancakes & oatmeal. What was really sounding good was some nice warm Cream of Wheat® – notice that little registered trademark sign – what we really wanted was Cream of Wheat® – That highly-overpriced box of goodness that sits on the top shelf in the cereal isle. We didn’t have any. Frankly, its not something that we really stock on a regular basis. Maybe because its SO.DANG.EXPENSIVE. Its good though. And when you are sick and something actually sounds good it really is somewhat of a miracle. The problem… We are sick. Its been raining. And freezing. The lovely dirt road that leads to our house is covered in a solid sheet of ice. No one really felt like going to the store… especially given the weather and current driving conditions. We considered the 10 min. drive to the local market for some “real” Cream of Wheat® – but I figured that there had to be some knockoff recipe of sorts on the web somewhere. So, my dear friend Google and I spent a little bit of time together this morning.

There were a few different ideas out there. And a few different variations to the those ideas from reader comments.
Seriously, what did people ever do without the web?

So, I found one that sounded reasonable, and did my own tweaking based on various comments and suggestions I found.

And the result.

Well, I’ll be the first to admit that this recipe doesn’t taste exactly like the official real deal Cream of Wheat® that you find at the grocery store.

BUT, the good news is that its better!!! And significantly less expensive! Sweet!!!
Take that you silly little “®” – we don’t need you anymore!

Seriously, 2 bites in and Dave was saying – “This is better than the real stuff!”
SCHWEEEET!!! Coming from him that is big news.

So, back to the recipe.

The first thing… sort of a disclaimer, really.
YOU HAVE TO HAVE A FOOD MILL/WHEAT GRINDER (or access to one)
(I have this one, if you are looking to get one. I highly recommend it… very much worth the investment, in my opinion.)

The Wheat used in this recipe needs to be Hard Red Wheat. Ground on the coarsest setting.

Also, one difference that you’ll find with my recipe vs. others you may google for is that I wanted to basically create my own “mix” – you know “the just add water” variety – so we could make this again quickly and easily in the future.
I think that the result was fantastic!!!!

Cream of Wheat (without the ®)

The Mixture:
4 cups (coarsely ground) wheat
1 c. white sugar
1 c.  powdered milk

Whisk together and store in an airtight container

Preparation:
– 4 c. Water
– 1/4 tsp. Salt
– 1 1/2 Tbsp. Butter or Margarine
– 1 1/2 c. Creamy Wheat mixture (above)

Heat water, salt, and butter in a saucepan until just boiling.
Slowly stir in Creamy Wheat mixture, whisking continuously.
Continue stirring continuously (to avoid lumping) until the cereal has thickened (5 min or so).
Remove from heat.

Serve warn with milk. Sprinkle with sugar if desired.

Note: The official Cream of Wheat® preparation instructions call for 1/3c. cereal to 2/3c. water. The ratios in my recipe is slightly different. If you prefer a thicker cereal use 2c. mixture instead of the 1 1/2c. called for in the recipe.

So. There you go.
Creamy, wheat-y cereal that tastes BETTER, costs LESS, and it pretty certainly BETTER FOR YOU that its store-bought counterpart. I will probably never buy the box from the top shelf with that cute little “®” ever again.

I hope you make it and LOVE it! I know it hit the spot for this little family!

P.S. I didn’t. But you could easily use margarine powder in the mix in lieu of butter or margarine during preparation and have yourself a true FOOD STORAGE recipe here!

P.S.S. During my morning date with Google, I stumbled upon a number of recipes for cookies or muffins, etc., that call for Cream of Wheat® as an ingredient. Perhaps I will try some of those in the coming days!

Tags: ,

Baked Blueberry Scones

Thursday, January 5th, 2012

This recipe comes from my childhood. Growing up my mom called them “blueberry biscuits” – but they seem a more like English Scones to me. . . thus the change in the name. They are pretty easy to make and super yummy. A word of advice – be sure to use FROZEN berries, not fresh. The fresh berries will lead to a sticky stained mess while cutting the dough.

Baked Blueberry Scones

2 C. sifted flour
1/2 C. sugar
3 tsp. baking powder
1/4 tsp baking soda
1 tsp salt
1/3 c. shortening
2 tsp zested orange peel
1 egg, beaten
1 tsp vanilla
3/4 C. buttermilk
1/2 C. frozen blueberries

Topping:
3 Tbsp butter, melted
3 Tbsp sugar
1/4 tsp cinnamon
dash of nutmeg

Preheat the oven to 400 degrees.
1. Combine flour, sugar, baking powder, baking soda, and salt
2. Cut in shortening until coarse
3. Add orange peel and mix lightly
4. Combine egg & vanilla with buttermilk, and add to flour mixture
5. Stir enough to blend
6. Add frozen blueberries and stir gently
7. Transfer dough to a floured surface and fold 5 or 6 times.
8. Pat dough to 1/2″ thickness
9. Cut out biscuits with a floured 2″ biscuit cutter
10. Bake on a greased cookie sheet for 15 minutes.

Topping:
1. Combine all topping ingredients
2. Spoon over biscuits while they are still warm (not hot)
3. (OPTIONAL) add a second coating of the topping when the biscuits are almost cool.

YIELD: 1 dozen

Pantry Pancakes

Monday, August 3rd, 2009

PantryPancakes

This recipe for pancakes is one of the tastiest I’ve had. The batter combines white and wheat flour with traditional pancake ingredients like milk, eggs, and vanilla to create a light but filling pancake with a fantastic flavor. The recipe is one I grew up with and was adapted from a resturant recipe for a cafe in California more than 20 years ago.

Please be forwarned, if you are used to the taste and texture of pancakes made from a mix you may have a hard time going back after making these. Just a warning.

Pantry Pancakes

2 eggs
3 1/4 cup milk
2 Tbsp. vanilla
1 tsp. salt
3/4 cup sugar
3/4 cup oil
2 cups white flour
2 cups wheat flour
4 tsp. baking powder

In a large bowl beat eggs until fluffy. Add milk, vanilla, salt, and sugar. Mix well.

Add oil and mix carefully.

Add 2 cups white flour and mix.

Add 2 cups wheat flour and mix again.

Add the baking soda and mix well.

Heat skillet and prepare pancakes.

NOTES:

  • The batter can be stirred using an electric beater or wire whisk.
  • Baking soda should be added right before cooking.
  • You can store leftover batter in the fridge several days. Bring to room temperature and stir before cooking.
  • The same batter can be used to make waffles.
  • For a slight flavor change, or for those that lactose intolerant, substitute all or part of the milk for Kern’s Apricot Nectar.

I hope you enjoy this recipe. Please, let me know what you think!!

Homemade Granola

Sunday, May 31st, 2009

Have you ever made your own granola?

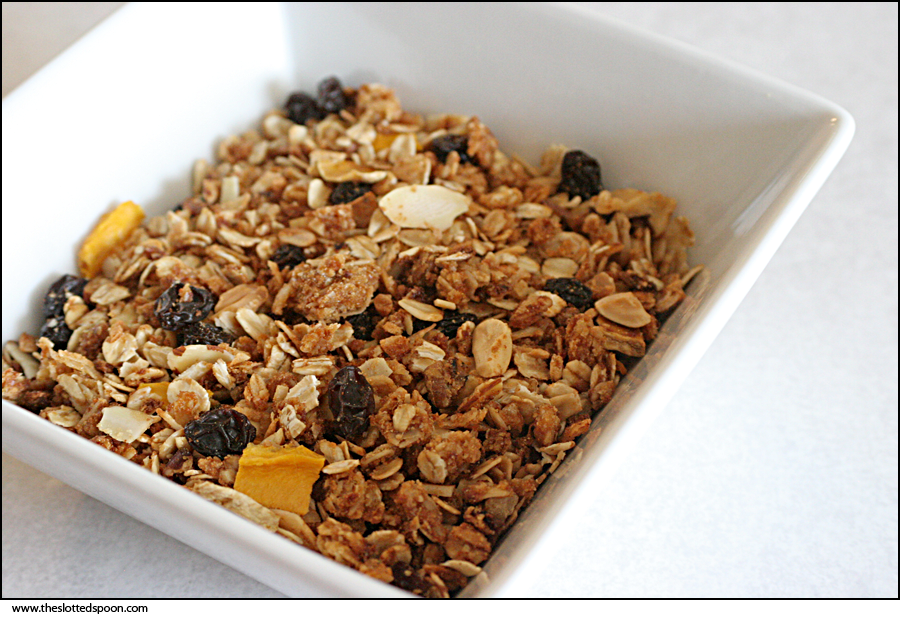
I tried it last week and was pleasantly impressed at how simple and easy it was. I’d tried it once before, but wasn’t paying enough attention to it as it baked in the oven and burned the heck out of it. This time was much more successful, and the result oh so yummy!

If you’ve ever purchased granola at the store you know how expensive it is. Making it yourself is definitely the way to go!

One of the best things about granola is how versatile it is. You don’t have to be completely precise in your proportions, and you can add a lot of other ingredients (or not). Its also incredibly filling, so one batch lasts quite awhile.

Note: If you decide to double this recipe, don’t try to cook it all at once. Overcrowding the pan will cause it to not cook evenly.

Homemade [Deluxe] Granola

4 1/2 c. rolled oats (do not use quick oats)
1 c. shredded coconut
3/4 c. wheat germ
3/4 c. sliced (or chopped) almonds
3/4 c. firmly packed brown sugar
1/2 c. instant non-fat dry milk

3/4 c. chopped misc. nuts (I used a combination of pecans, walnuts, and peanuts) – optional

1/3 c. vegetable oil
1/3 c. honey

1/2 c. dried fruit (I used dried apples, bananas, and mangos) – optional
1 c. raisins – optional

Preheat the oven to 325 degrees. Grease a large baking pan (approx. 16 x 11 x 2″) with shortening and set aside (a good coating of PAM will also work).

Combine the first 6 ingredients in a large mixing bowl. Add additional nuts/seeds as desired. Mix well.

In a small saucepan combine the oil and honey (hint: measure the oil first then use the same measuring cup to measure your honey. The oily residue will help the honey slip out of the cup more easily). Heat on the stove until the honey is dissolved and the mixture well blended. Stir well throughout.

Add the honey mixture to the dry ingredients and stir to coat.

Spread into prepared pan and bake for 15 to 20 minutes. Stir with spatula every 5 minutes until the granola reaches the desired color.

Remove from the oven and stir in dried fruit and raisins.

Cool completely and store at room temperature in an airtight container.

OPTIONS:
Nut/Seed suggestions: sunflower seeds (shelled), sesame seeds, pecans, filberts, peanuts, walnuts, cashews
Fruit suggestions: raisins, chopped dates, dried (chopped) apricots/peaches/bananas, dried mango, dried cranberries

You can make an apple-cinnamon granola by adding 1 Tbsp cinnamon and 1 1/2 c. dried chopped apples in place of dried fruits/raisins.

You can make a maple flavored granola by replacing the honey with pure maple syrup

I hope you enjoy this recipe. We sure do. I’d love to hear what variations you use! I was wondering about freeze dried strawberries… if anyone tries that, let me know. What is your favorite granola addition? How do  you take your granola… dry by the handful? With milk as a breakfast cereal (my personal favorite)? As a yogurt topping? Please share.

Tags: , , , , , , ,

Gourmet French Toast

Friday, March 13th, 2009

Here’s another from my mom’s file.

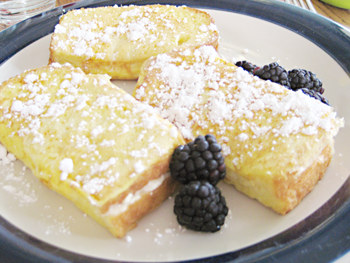
Gourmet French Toast, or “Glorified” French Toast (as mom called it), is fabulously delicious – and entirely bad for you! And really, really easy!

Gourmet French Toast

Note: All quantities are approximate and can be fudged. Feel free to modify and experiment.

10 slices of bread, cut in half
4 oz. (half package) of cream cheese, softened
1/2 c. Apricot-pineapple Jam (marmalade or thick flavored syrup will also work)
5 eggs
Splash of milk
Powdered sugar

Beat eggs and milk in a bowl, set aside

Combine cream cheese and jam until few lumps remain.

Spread the cream cheese mixture on one half-slice of bread and top with another half-slice (like a sandwich). Dip the completed sandwich in the egg mixture, coating both sides. Place on greased pan or griddle. Flip over, cooking both sides until the egg is cooked and slightly brown.

Serve warm with sprinkled powdered sugar.

Yield: 10 half-sandwich portions.

This is probably one of my favorite breakfast items. Its pretty sweet, but not overly rich. And when I think about the “bad for you” aspect, I can’t help but wondering if its not better than the classic butter and syrup alternative.

I served mine with blackberries last time (for effect)… too bad I didn’t have any mint leaves lying around. 🙂

Let me know if you try these and what you think!

Tags: ,