Archive for March, 2009

Spinach-Artichoke Dip

Tuesday, March 31st, 2009

Lately I’ve been thinking about this super yummy Spinach-Artichoke Dip I make. I think maybe it stems from having gone to Chili’s with my husband last week… we got a spinach artichoke dip as an appetizer. It was good, but I think its starting to fade from my system. -grin- I’m pretty sure I’ll either need to make some or go order some soon.

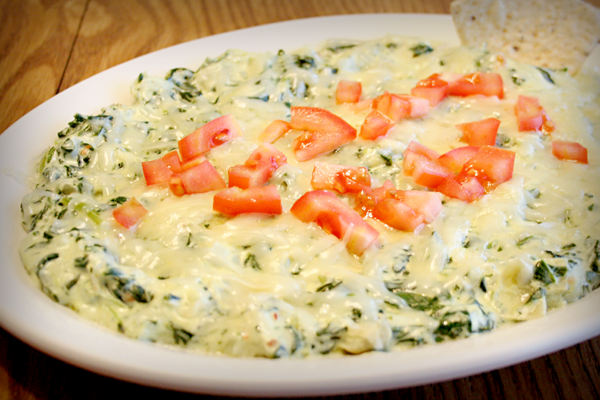
Doesn’t it just look delicious?? Its not the most healthy thing you could eat, but it sure is appetizing. And addicting.

I’ve been guilty of nearly consuming the entire platter before.

Anyway…

This recipe is a variation of one I found online awhile back. I don’t remember the original source though. Sorry.

Spinach-Artichoke Dip

1/2 onion, finely chopped
1 stick butter
1 pkg. frozen spinach, thawed
8 oz. Philly cream cheese
8 oz. sour cream
3/4 c. shredded Parmesan cheese
1 jar marinated artichokes, chopped
red pepper flakes to taste
8 oz. shredded Monterey Jack cheese
1 Roma tomato, diced
1 green onion, chopped.

Sauté onions in butter.

Add other ingredients one at a time, while mixing, and blend well after each addition. Add ingredients in this order: Spinach, Cream Cheese, Sour Cream, Parmesan Cheese, Artichoke Hearts, Crushed Red Pepper Flakes.

Remove from heat and put in crocks or microwave dish.

Pour mixture onto a plate or platter. Top with Monterey Jack Cheese, tomatoes and green onion. Melt.

Serve hot with chips or bread.

This recipe makes quite a bit. Enough to fill 2 decent-sized platters. Good news is that it freezes well! Just spoon the unused portion into a freezer safe container or freezer bag. When you are ready to eat it: defrost, heat, and top with cheese, green onion, and tomato.

Disclaimer: I am craving this dip because I went to Chili’s, but I make no claim that this recipe is a copy-cat of theirs. But it is dang good.

Speaking of Chili’s… I do intend to try and duplicate a couple of their other recipes (appetizers). Watch for those soon!

Tags: , , ,

Cream Cheese Fondant

Thursday, March 26th, 2009

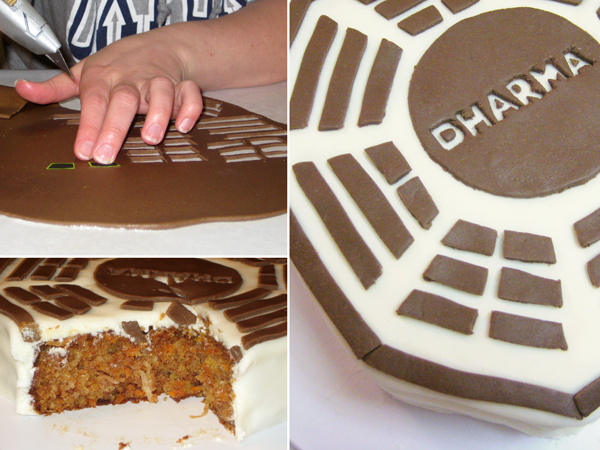
I had my first ever experience using fondant the other day. I wanted to make a cake for my husband’s birthday that looked like the logo for the Dharma Initiative (nevermind what that is, unless you are a LOST fan). The point is, I needed fondant. I’d heard horror stories about the yucky taste of the Wilton fondant and how hard it is to work with. I’d also heard that homemade fondant tastes better, but most of the recipes I’d found used ingredients like glucose or glycerin. Being new at this, I was feeling just a bit intimidated.

But then I came across the blog of a friend of mine. She makes cakes and had a recipe posted for a Marshmallow Fondant. I talked to her about it and she mentioned that it was pretty easy and reassured me that I could make this without too much trouble.

So I took the plunge.

Her recipe noted that chocolate (dark, milk, or white) could be added to make a chocolate fondant. That seemed interesting, but I was making a Carrot Cake, so I was wondering if I could add a cream cheese flavoring to the fondant. My google searches came up empty. But I risked it anyway (figuring marshmallows are cheap if I screw up).

So I modified her recipe to include a small amount of cream cheese.

The resulting flavor was very subtle, but it worked well with the cake. The fondant was also a bit stickier, but adding a bit more powdered sugar worked well.

So, first is the original recipe from Camille’s Cakes (slightly reworded). Then, my modification, Cream Cheese Fondant.

Marshmallow Fondant
8 oz. mini marshmallows
1 Tbsp. water
1 1/2 – 1 3/4 c powdered sugar
Crisco

Place marshmallows in a microwave safe bowl and add the water. Microwave in 20 seconds increments until they “puff up.” Go slowly. Stir in with a spoon until it’s all “soupy.” Add the powdered sugar. Knead it with the spoon until it’s all mixed well. Then you can knead it on a lightly greased (with Crisco) surface.

If you want to add color or flavoring to the fondant do so at the “soupy” stage.

Keep covered in an air-tight container so it doesn’t dry out. If it’s too hard to work with, stick it in the microwave for a few seconds (ten or so) and it softens right up, like playdough!

Variations:

Chocolate:
add 1 oz. melted chocolate
1 t. cocoa powder to basic recipe

White Chocolate:
add 1 oz. (maybe 1 1/4 oz.) good quality white chocolate, melted to basic recipe.

And this is my modification:

Cream Cheese Fondant
8 oz. mini marshmallows
1 Tbsp. water
1 oz. cream cheese
1/4 tsp. vanilla extract
3 cups (approx.) powdered sugar
Crisco

Place marshmallows, vanilla, and cream cheese in a microwave safe bowl and add the water. Microwave in 20 seconds increments until they “puff up.” Go slowly. Stir in with a spoon until it’s all “soupy.” Slowly add the powdered sugar. Knead it with the spoon until it’s all mixed well and no longer sticky. Then knead it on a lightly greased (with Crisco) surface until smooth.

*Note: The cream cheese seems to make this recipe a bit more sticky, thus the need for additional powdered sugar.

Store extra fondant in an airtight container in the refrigerator. Bring to room temperature, microwaving a few seconds at a time as needed, before use.

Please note, I do not claim to be any type of fondant authority. This is just what worked for me.

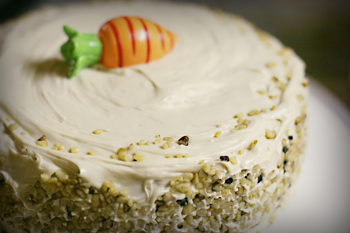
On the Carrot Cake I made, I first frosted it with traditional cream cheese frosting, and then covered it with the cream cheese fondant. It taste of the fondant was sweet and a bit sugary and it blended well with the frosting layer beneath it. I don’t think that it would hold up as a cream cheese flavored topping on its own, but it didn’t detract from the carrot cake/cream cheese frosting flavor.

Also note: In the images above I used a chocolate fondant for the decal on the cake. I didn’t like the chocolate flavor with the cream cheese/carrot cake, so we ended up pulling off those pieces when we ate it. In retrospect I think I should have simply colored the cream cheese fondant. Next time.

Last but not least, I imagine at some point in my future I will try other types of fondant recipes just so I have something to compare, but in the meantime I think this is a great recipe worth trying and using. Thanks again Camille.

(I also came across a website with a similar – though slightly more complex – recipe. But they also have some good tips on covering the cake with the finished fondant.)
Tags: , ,

My Favorite Carrot Cake

Thursday, March 26th, 2009

A few years ago I found a recipe for Carrot Cake that I LOVE! It’s pretty easy to make and very moist and yummy. I think that the addition of crushed pineapple is especially fabulous. The original recipe came from AllRecipies.com (Marc Boyer). I only changed a couple of things to suit my liking… pecans instead of walnuts, use of a different pan size — the cake really doesn’t need modifying. Its super delicious as it is.

Thanks Marc, for the fabulous cake!

My Favorite Carrot Cake

2 cups white sugar
3/4 cup vegetable oil
3 eggs
1 teaspoon vanilla extract
3/4 cup buttermilk
2 cups grated carrots
1 cup flaked coconut
1 (15 ounce) can crushed pineapple, drained
2 cups all-purpose flour
2 teaspoons baking soda
2 teaspoons ground cinnamon
1 1/2 teaspoons salt
1 cup chopped pecans (original recipe called for walnuts)
1/2 cup butter
1 (8 ounce) package cream cheese
1 teaspoon vanilla extract
4 cups confectioners’ sugar

Preheat oven to 350 degrees. Grease and flour pan(s) — 9×13 inch or (2) inch pans. Set aside.

In a large bowl, mix together sugar, oil, eggs, vanilla, and buttermilk.

Stir in carrots, coconut, vanilla, and pineapple. In a separate bowl, combine flour, baking soda, cinnamon, and salt; gently stir into carrot mixture.

Stir in chopped nuts. Spread batter into prepared pan(s).

Bake for 55 minutes or until toothpick inserted into cake comes out clean.

Cool completely before frosting.

CREAM CHEESE FROSTING:

In a medium mixing bowl, combine butter or margarine, cream cheese, vanilla, and confectioners sugar.

Blend until creamy.

Cake can be removed from pan, or frosted while still in the pan as desired.

Tags: , , , ,

Strawberry Pecan Bread

Wednesday, March 18th, 2009

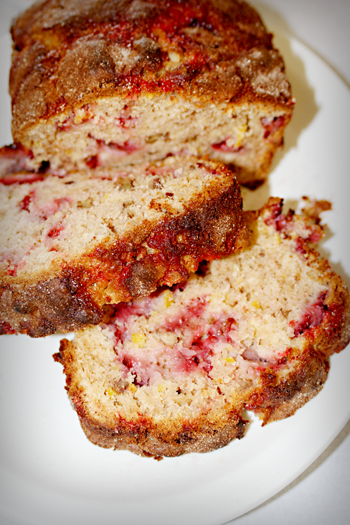
The other day I was looking for a recipe for some Strawberry bread. I’d purchased some strawberries at a local supermarket and wanted to make something yummy with them. I’d made Strawberry bread in the past, but remember it being just a little bit bland and somewhat sour. I wanted something sweeter. Something with more flavor. Something with a bit of a crispy crust. So I set out to do a little internet research.

I looked at dozens of recipes. I wrote down some of the ingredients unique to each recipe or things that sounded good to me. When I was done, I had a pretty good idea of what I wanted to put in MY Strawberry bread.

I spent a little time coming up with the right quantities, and got busy cooking.

The result was an amazingly delicious bread, and a new recipe.

I challenge you to make this. I think you’ll like it. I think you’ll really really like it. And if you do, please leave me a comment and tell me about it!

Strawberry Pecan Bread

2 1/2 cup flour
1 tsp. baking powder
1/2 tsp baking soda
1/4 tsp salt
1/4 tsp cinnamon
3 eggs
1 cup sugar
1/3 cup oil
1 tsp vanilla
red food coloring
1/3 cup sour cream
1 lemon
1 1/2 cup fresh strawberries, sliced
1/2 cup chopped pecans
3 Tbsp strawberry preserves

TOPPING:
Hershey’s Strawberry Syrup
4 Tbsp sugar
1 tsp cinnamon

1. Preheat oven to 350 degrees. Prepare (grease and flour) bread pan(s). Recipe makes one average sized loaf and one small loaf, or one large loaf.

2. Combine flour, baking powder, baking soda, salt, and cinnamon. Set aside.

3. In a large bowl, cream together eggs and sugar until well blended. Add oil, vanilla, 3-4 drops red coloring, and sour cream. Mix well.

4. Grate peel/zest of lemon into the bowl. Squeeze the juice from one half of the lemon into the bowl. Stir again.

5. Add dry ingredients to egg mixture. Stir just until moistened. DO NOT over stir.

6. Fold in strawberries, pecans, and preserves. Pour into prepared pans (fill half full).

7. Squeeze a small amount of strawberry syrup over the top of the bread in a zig-zag pattern. Combine sugar and cinnamon and sprinkle over the bread.

8. Cook at 350 degrees for approx. 1 hour, until it tests done.

9. Remove from pans and cool completely on wire rack. Slice, and serve!

Ooh, this bread is good. Can you smell it cooking already??

You can eat this bread plain. Toasted. With butter. With Cream cheese. Or, you can try this Creamy Strawberry Butter recipe:

Creamy Strawberry Butter

1/c cup butter or margarine
2 oz. cream cheese
2/3 cup powdered sugar
1/4 c. chopped strawberries, well drained

Beat together butter, cream cheese, and powdered sugar until well blended. Beat in strawberries. Spread on finished bread.

The strawberry butter is pretty good, but I’m undecided as to whether its my topping of choice for the bread. I’m a pretty big fan of the ‘ol toast and butter method. If you try the strawberry butter I’d be interested to know what you think. Is it the best topping for the bread? What, if anything, do you top it with?

Tags: , , ,

Corned Beef & Cabbage

Friday, March 13th, 2009

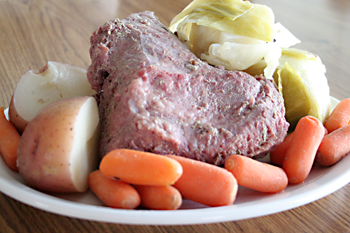
In honor of the upcoming holiday, I give you. . . Corned Beef and Cabbage.

Corned Beef is traditional Irish/St. Patrick’s day dish.
This is what wikipedia has to say:

Corned beef (also ‘bully beef’ in the UK) is a cut of beef (usually brisket, but sometimes round or silverside) cured or pickled in a seasoned brine. The “corn” in “corned beef” refers to the “corn” or grains of coarse salts used to cure it. The Oxford English Dictionary dates the usage of “corn,” meaning “small hard particle, a grain, as of sand or salt,” to 888, and the term “corned beef” to 1621.[1] The term “corned beef” can denote different styles of brine-cured beef, depending on the region. Some, like American-style corned beef, are highly seasoned and often considered delicatessen fare.”

And here’s the recipe:

Corned Beef and Cabbage

Corned Beef Brisket (I used the point cut, because it was smaller. A flat cut is also available)
Cabbage
Red Potatoes, halved
Carrots
Water
The Corned beef should come with its own seasoning packet. Put the brisket and the seasoning in a crock pot. Cover with water.

Add the potatoes and carrots.

Cook for 2-3 hours, depending on the size of your meat.

Quarter the head of cabbage and add it to the crock pot. Cook an additional 45 mins.

Eat Up!

Tags: , , , ,

Gourmet French Toast

Friday, March 13th, 2009

Here’s another from my mom’s file.

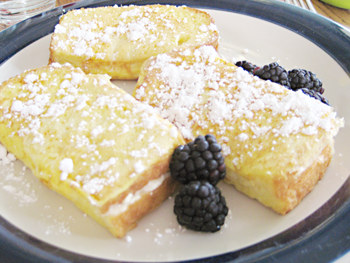
Gourmet French Toast, or “Glorified” French Toast (as mom called it), is fabulously delicious – and entirely bad for you! And really, really easy!

Gourmet French Toast

Note: All quantities are approximate and can be fudged. Feel free to modify and experiment.

10 slices of bread, cut in half
4 oz. (half package) of cream cheese, softened
1/2 c. Apricot-pineapple Jam (marmalade or thick flavored syrup will also work)
5 eggs
Splash of milk
Powdered sugar

Beat eggs and milk in a bowl, set aside

Combine cream cheese and jam until few lumps remain.

Spread the cream cheese mixture on one half-slice of bread and top with another half-slice (like a sandwich). Dip the completed sandwich in the egg mixture, coating both sides. Place on greased pan or griddle. Flip over, cooking both sides until the egg is cooked and slightly brown.

Serve warm with sprinkled powdered sugar.

Yield: 10 half-sandwich portions.

This is probably one of my favorite breakfast items. Its pretty sweet, but not overly rich. And when I think about the “bad for you” aspect, I can’t help but wondering if its not better than the classic butter and syrup alternative.

I served mine with blackberries last time (for effect)… too bad I didn’t have any mint leaves lying around. 🙂

Let me know if you try these and what you think!

Tags: ,

Earth Bread

Thursday, March 12th, 2009

This is a recipe my mom made a bit while I was growing up. I think she got it from a food program on KSL years ago – but its hard to remember. Anyway, its a great way to use some of those fresh vegetables from your garden. (Not my garden, I don’t currently have a garden)…

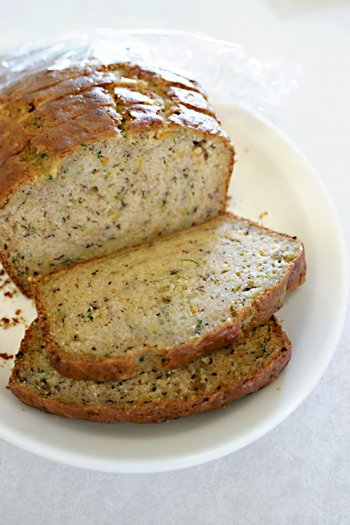
Anyway, think Banana bread meets Zucchini bread. …meets carrots… meets pumpkin pie spice… its pretty good!

Earth Bread

Earth Bread

3 cups flour
1/4 tsp cinnamon
1/2 tsp pumpkin pie spice
1 tsp baking soda
1/2 tsp baking powder
1 tsp salt
1 1/2 cups sugar
3 eggs
3/4 cup oil
1/4 cup water
2 tsp vanilla
1 cup mashed banana
1/2 cup grated carrots
1 cup grated zucchini
1/2 cup chopped nuts
.
In medium size bowl mix together well the dry ingredients.
In large bowl mix together well the eggs, oil, water, and vanilla.
.
Stir dry ingredients into wet ingredients.
Add in banana, carrots, zucchini, and nuts. Mix only until it’s thoroughly mixed
.
Pour into pans of choice that have been greased and floured. Bake at 350 degrees. Takes 30-60 minutes to bake depending on pan size/selection.
Cool 10 minutes on wire rack before removing from pan.
*Slices better after additional cooling and when sliced thick.

Since I didn’t have a garden this year, I used zucchini from my mom’s… and carrots from a neighbor’s garden. Thanks guys! I left the nuts out this time since I didn’t have any on hand, but I have to say that I MUCH PREFER it with nuts. It just adds another dimension to the bread. If you make it, let me know what you think!

Tags: , , ,

The Slotted Spoon

Thursday, March 12th, 2009

Welcome to The Slotted Spoon!

This blog was created as a home for recipes I create, modify, or otherwise collect. In the past I would pretty regularly post recipes on my personal blog, but found that the general category “food” was too vague for the items being posted. I wanted to expand, have my recipes centrally located, and be able to have categories for all types of food.

Eventually I’d love to publish a cookbook. I see that being a year or so out still though.

The name “The slotted spoon” came for the Broadway Musical, Into the Woods, by Sondheim. It has long been one of my favorite musicals and was quickly referenced when thinking of a title for this blog.

Over the coming weeks I plan to first, migrate existing recipes from my personal blog, and then begin to introduce new recipes. Hopefully it won’t be long before you are able to find all manner of delectable goodies here. Thanks for visiting!

For more information, please visit the “About” page.